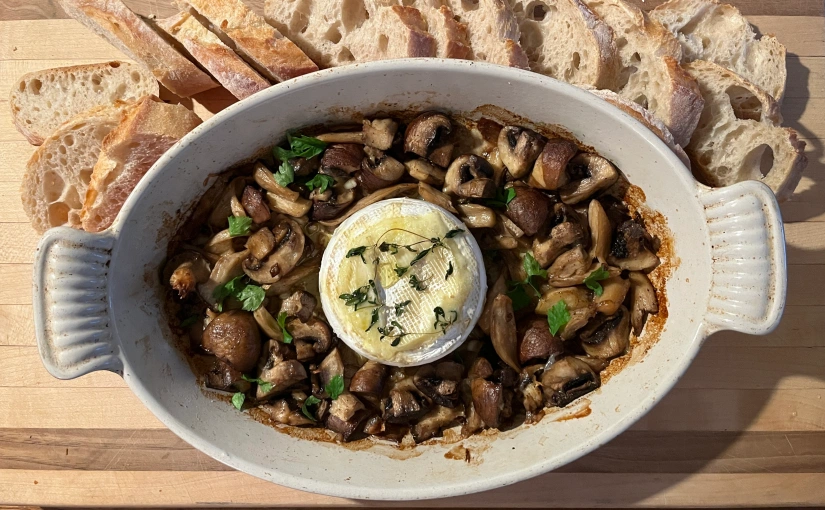
Garlicky Roasted Mushrooms and Brie

The recipe comes from the Smitten Kitchen website, a huge favourite of mine. Her printed cookbooks are great too! I made one change to the recipe: her version called for capers, but my Main Eater doesn’t enjoy capers so I substituted olives to provide that salty flavour. She suggests anchovies as a substitute, but those are also not a favourite here. I used a bit more garlic than the recipe called for, and served it with freshly sliced baguette instead of toasted baguette, just to keep it simple. I opted for Camembert, but gooey Brie would also be awesome!

This was way more than the two of us could eat, so it is safe to say this would be a good amount for an appetizer for four people.

Photo of a serving dish containing roasted mushrooms with a round of cheese in the centre, placed on a cutting board surrounded by slices of baguette.

What you need:

  • 1 lb mushrooms (I used Cremini and King Oyster)
  • 2 tablespoons minced olives (or capers)
  • 3-4 cloves minced garlic (not run through a garlic press)
  • 1 teaspoon Kosher salt (or less to taste)
  • 2 tablespoons vegetable oil
  • freshly ground pepper
  • 3 tablespoons cold, unsalted butter
  • juice of half a lemon (or less)
  • a few sprigs of parsley (garnish)
  • a few sprigs of fresh thyme if you have it
  • 8 oz wheel of Brie or Camembert
  • baguette, sliced or toasted

What you do:

  1. Preheat the oven to 425F.
  2. Break the mushrooms up into bite-sized pieces using your hands. I just cut the ends off the stalks first, then tore the mushrooms up.
  3. Mix together the mushrooms, olives, garlic, salt, oil and quite a bit of pepper in a baking dish, large enough that it will have enough room to add the cheese later.
  4. Cut the butter up into small chunks and sprinkle tit over the mushroom mixture.
  5. Roast for 15 minutes, turning halfway through.
  6. While the mushrooms are in the oven, use a knife to score a circle in the top of the cheese, then remove the top of the cheese. This will allow for easier serving. (You CAN eat the rind).
  7. Push the mushrooms aside to make a space for the cheese. Place the cheese in the middle of the baking dish, place the fresh thyme on top of the cheese, then put it all back in the oven for about 10 minutes. The cheese should be melted, so if it’s not, you can give it a few more minutes in the oven.
  8. Squeeze a bit of lemon juice over the mushrooms and garnish with parsley. Serve immediately!

Gochujang Chicken Strips – Air Fryer Version

photo of breaded chicken strips on a plate with red chili sauce  in a bowl

These chicken strips are really easy to whip up in an Air Fryer. With a bit of spice and a crunchy exterior, they’re pretty addictive!

The majority of the recipes I post are recipes that someone else has created; most of the time I make some changes to the recipe, and sometimes I follow the recipe to the T. This one I made up myself, and I have to tell you it’s a good one!!

It’s been far too long since I last posted a recipe on here, but I’m starting to see the light at the end of the tunnel in my Master’s program. I haven’t been taking any photos of my food makes for a long time, so when I made up this recipe last night I again didn’t take a photos. I did remember what I put in the recipe, and it was so good that I had to make it again tonight, and this time I took a few photos.

What’s so great about this recipe, you ask? Well . . . these chicken strips are really tender thanks to the air fryer cooking method, and the chili coating brings a ton of flavour to them. Plus there’s no added oil, other than a little bit that you spray on the cooking surface.

Gochujang is a Korean chili paste that has a little heat, a little sweetness, and is slightly fermented. You can find Gochujang paste at any Korean grocery store; I get mine at Kim’s on Broadway in Vancouver.

I was a holdout on the Air Fryer purchase, but the more I read peoples’ opinions on it and heard from friends what they liked about it, I figured I should look into it. I do not like to have a ton of machines, and the Air Fryer machine is quite large, so I bought the Air Fryer lid for the Instant Pot that I already own. Since then I’ve done a lot of roasted veggies, Agadashi Tofu, and a few different chicken strip recipes. All have been excellent, and all have taken so little time that I am motivated to try more recipes. I made this recipe, start to finish, in less time than it would take me to preheat my oven.

I served these with Air Fryer roasted cauliflower last night, and tonight I made breaded zucchini in the Air Fryer. Air Fryer fries are also awesome! I dipped the chicken in a sweet chili sauce, but feel free to use your sauce of choice or no sauce at all.

What you need:

  • 1 chicken breast
  • 2 tablespoons Gochujang paste
  • 2 teaspoons soy sauce
  • 2 teaspoons Mirin
  • 1 clove garlic, crushed
  • 1/3 to 1/2 cup Panko crumbs

What you do:

  1. Combine the Gochujang, soy, mirin, and garlic in a bowl.
  2. Put the Panko crumbs in another bowl.
  3. Cut the chicken breast into strips.
  4. Place the chicken in the Gochujang mixture and coat all sides.
  5. Using a fork, place a piece of chicken in the Panko crumbs and coat all sides.
  6. Spray the Air Fryer with oil spray, then place the chicken on the Air Fryer rack in a single layer, with a little space between each piece.
  7. All Air Fryers will work differently, so get to know the cooking times on your machine. For my Instant Pot Air Fryer lid, I cooked the chicken at 400F with no preheating. First I cooked it for 4 minutes, then flipped the chicken and cooked it two minutes more. If you are testing your machine out, you could try cooking for a shorter amount of time so you don’t overcook, then add a minute at a time. Make notes about your cooking times.
  8. Enjoy them while they are hot!
photo of Trader Joe's soy sauce, Mitkusan mirin, Korean Gochujang paste, and a clove of garlic
photo of two bowls, one with chicken coated in a red paste, the other with chicken coated in panko breadcrumbs
photo of chicken strips in an instant pot air fryer

The Best Cornmeal Muffins!

cornmeal muffin on a plate

I found this recipe for “Perfect Corn Muffins” on Smitten Kitchen, and she’s right, these are the best cornmeal muffins I’ve ever tasted. I’m using the word “cornmeal” because I feel like “corn muffins” sounds like there are actual kernels of corn in it, which there are not in this recipe.

The changes I made were just because I didn’t have some of the ingredients on hand, so I used buttermilk instead of whole milk, and yogurt in place of sour cream. The recipe called for 3-5 tablespoons of sugar, and I went with just shy of three because I don’t enjoy sweet cornbread.

These were delicious with a little bit of Irish Kerry Gold butter, and another was eaten with a slice of mature cheddar. I had planned to serve them with Instant Pot baked beans, but they are taking forever instead of an instant to cook, so they’ll have to go with the leftovers.

The recipe is straightforward except one part that was new to me: some of the cornmeal was cooked before mixing, which is probably part of the reason that these were so moist. You will separate the two cups of cornmeal into 1 & 1/2 cups with the dry ingredients, and 1/2 cup to be cooked.

What you need:

  • 2 cups yellow cornmeal (I used Purity brand)
  • 1 cup all-purpose flour
  • 1 & 1/2 teaspoons baking powder
  • 1 teaspoon baking soda
  • 1 & 1/4 teaspoons salt
  • 1 & 1/4 cups buttermilk (or whole milk)
  • 1 cup plain yogurt, not no-fat (or use sour cream)
  • 1/2 cup butter, melted and left to cool
  • 3 to 5 tablespoons (35 to 60 grams) sugar (see Note up top about sweetness)
  • 2 large eggs

What you do:

  1. Preheat the oven to 425°F. Line a 12-cup muffin tin with paper or silicone liners; I used silicone, and they slid off really nicely after baking.
  2. In a medium-sized bowl combine 1 & 1/2 cups of the cornmeal, flour, baking powder, baking soda and salt.
  3. Melt your butter and let it cool a bit.
  4. Add the milk and 1/2 cup cornmeal to a saucepan and cook over medium heat. Stir until it has thickened enough that your spoon/whisk leaves a clear line across the bottom of the saucepan, which slowly fills in.
  5. Mix the melted butter, sugar and yogurt into the cooked cornmeal. If the mixture is cool enough, mix in the eggs. If not, wait a few minutes so the eggs don’t cook when you add them.
  6. Fold the dry ingredients into the eggy-buttery mixture until just combined. The batter will be quite thick.
  7. Scoop the batter into the muffin tins; using an ice-cream scoop or measuring cup can help to keep the amounts even. The batter will completely fill the muffin cups and mound up a bit.
  8. Bake for about 13 minutes, until the tops are just golden brown. Insert a toothpick to see if they are done. There should be no batter sticking to the toothpick. My oven is really annoying, so some were done at this point, and some not. I rotated the pans and left them in for three more minutes.
  9. Let the muffins cool in the pans for five minutes, then remove from the tins and let them cool five minutes more. Because mine were in silicone liners, I removed them at this point.
  10. Enjoy!

Lemon-Cilantro Hummus

Well it’s been about eight months since I’ve posted a recipe; working full time and working on a master’s degree doesn’t leave a lot of time for hobbies. I’m still cooking of course, and finally took a photo of something, so thought I’d share this yummy and delicious hummus recipe.

If I had more time I would have cooked my own chickpeas, but happy to have a time-saving can of them in my cupboard!

For the smoothest hummus you can take a few minutes to remove the peels from the chickpeas. It really does make a difference! But of course you can just throw them in there with the skins on.

This is best made in a food processor, but if you have a blender or immersion blender, those could do the trick. I suppose if you had a lot of time you could do it with a potato masher . . . ? Let me know if you try that!

I purposefully didn’t add amounts here. In the procedure below I suggest how much I added, but this is a really good recipe for “adding to taste;” add a little, then a little more if needed. I like mine lemony, and I like to serve it right away . The leftovers are excellent, but the batch fresh out of the food processor is the best.

I have been eating this hummus with crackers and as a dip for veggies.

What you need:

  • can of chickpeas, drained, and preferably with skins removed
  • tahini
  • garlic, crushed
  • cilantro, clean and chopped once or twice, stems and all (unless there are some really thick, woody stems)
  • salt
  • lemon
  • cumin

What you do:

  1. Pour the chickpeas into the bowl of the food processor.
  2. Add a dollop of tahini. I used about 1/4 cup.
  3. Put the lid on the food processor and blend it up for about a minute.
  4. Add a clove of crushed garlic (or more if you love your garlic), a whole bunch of cilantro (mine wasn’t a huge bunch), a little salt, half a lemon to start, and a pinch of cumin to start. Let that process until the cilantro is well chopped, and the hummus is creamy.
  5. Taste your hummus and see what you’d like to add more of. I almost always add a bit more lemon.
  6. Add a bit of water to make it the consistency you like and process again until it is really smooth, and you have the right balance of flavours. If you are going to refrigerate your hummus, keep in mind that it gets firmer when it’s been in the fridge for a while, so adding a bit more water can be a good idea.

Iced Oatmilk Coffee

When the hot weather starts, this is my favourite beverage. To be fair, hot weather in Vancouver isn’t all that hot, but I’m a bit of a lightweight when it comes to heat.

This is one of the easiest “recipes” I have posted. Espresso (or really strong coffee), ice, and Oatmilk (or your choice of “milk.”) And Enjoy.

Thanks to my old friend Mike Peterson for introducing me to Oatmilk through his Cereal reviews! Oatmilk is the perfect non-dairy drink! I prefer the unsweetened version of Earth’s Own Oatmilk, because it works so well in coffee, tea, and in my steel cut oats and breakfast.

What you need:

  • ice
  • espresso or very strong coffee
  • oatmilk, or milk of your choice

What you do:

  1. Prepare espresso.
  2. Put ice in a glass.
  3. Pour the espresso over the ice.
  4. Pour in some oatmilk.
  5. Drink it while it’s nice and cold!

Fava Avocado Spread

I’ve been growing fava beans on my balcony all winter. Planted in November, and beginning to harvest at the end of May. I didn’t think I would be harvesting so late, but it is so worth it! The beans are creamy and have lovely flavour. And check out the photo at the bottom of the page to see the gorgeous green of the bean after shelling!

This recipe is more of a guide. What I thought was going to be a massive crop, ended up being only 8 pods (for now), which yielded 18 beans. So I ended up making a really small portion of this spread, using less than half of an avocado.

In the photo I’ve got some delicious corn crackers, but we actually preferred the fava-cado spread on a piece of bread. The crackers had a lot of flavour on their own, so the milder bread allowed the flavours of the fava and avocado to shine through.

A word on growing fava beans: Yes, you can grow them in summer, but when I did that they got infested with aphids. Growing them over winter, in Vancouver, was pretty easy. I just had to wrap them up a bit when we had a cold snap. So after half a year of growing, I finally get to eat them! This is the first harvest, but there are a lot more pods still growing . . . hmm, what should I make with the next harvest?

What you need:

  • avocado
  • fresh fava beans
  • lime
  • salt
  • bread or crackers

What you do:

  1. To prepare the fava beans, get a pot of salted water boiling. String the pods and remove the fava beans. Boil the beans for 3 minutes. Drain the beans and then put them in a bath of ice water right away. This will help them to stop cooking, and retain their gorgeous bright green colour.
  2. Now you can slide the beans out of their skins, revealing the gorgeous green colour!
  3. Mash the fava beans together with some avocado (I used more fava than avo). Use an immersion blender if you like. Season with a little bit of salt and a squeeze of lime.
  4. Serve with bread or crackers right away. Not as good after refrigeration.

Oven-Baked Falafel

These oven-baked falafel are super tasty, and my official taster is looking forward to eating them again! Deep-fried falafel are delicious, I don’t enjoy cooking with boiling oil, and I think baking is healthier.

This photo was taken before the tahini sauce, hot sauce and pickled turnips went on – oops! Somebody was eager for the photos to be done so the eating could begin. I’ve also served these with some hummus and a cucumber, tomato and herb salad.

I found an aleb falafel, a falafel shaping device, for under $10 at a local Middle Eastern store. You can use a spoon or your hands to form them if you don’t have an aleb falafel.

falafel shaping device

This recipe is especially easy to make if you have a food processor, but you could also give it a try with a potato masher. It’s quite simple: all the ingredients go into the food processor bowl, you whiz it up, form the balls, and bake them. While they are baking you can prepare sauce and veggies.

These falafel freeze quite nicely!

What you need for the falafel:

  • 2 cans chickpeas, rinsed and drained, or equivalent home-cooked
  • 3 large eggs
  • 1/ 2 cup bread crumbs
  • 1 large white onion, chopped
  • 1 cup flat leaf parsley
  • 1 cup cilantro (I like to use the stems too)
  • 1 tablespoon crushed garlic
  • 1/4 cup olive oil
  • 1 teaspoon baking powder
  • 1 & 1/2 teaspoons cumin
  • 1 teaspoon paprika or Aleppo pepper
  • 1 teaspoon salt
  • olive oil for brushing on top of falafel before baking

What you need for the tarator sauce:

  • 1/2 cup tahini
  • 1 teaspoon crushed garlic
  • 1/4 to 1/2 cup lemon juice
  • 1/4 to 1/3 cup water
  • salt to taste

What you do for the falafel:

  1. Heat the oven to 375F. Line a baking pan with parchment paper.
  2. Add the chickpeas, eggs, bread crumbs, onions, parsley, cilantro and garlic to the bowl of the food processor and process until the mixture becomes doughy.
  3. Add the baking powder, seasonings and olive oil and process again until all the ingredients are combined.
  4. Form falafels with an aleb falafel (I lightly oiled mine before use), or scoop with a tablespoon and form into flattened balls with your hands.
  5. Use a pastry brush to brush a little bit of olive oil on the tops of the falafel, to help them brown nicely. Browning = flavour!
  6. Bake for about 25 minutes, then check to see if it is done; mine needed more time. You will know when it is done if a knife inserted in the centre comes out pretty much clean.
  7. While the falafel are baking you can make the sauce.

What you do for the taratour sauce:

  1. Mix the garlic in with the tahini.
  2. Add a little bit of lemon juice and mix well. Add lemon juice and water a little at at time until the sauce is creamy but not too runny.
  3. Add salt to taste.
  4. Enjoy!!

Sour Cherry – Chocolate Bread

sour cherry and chocolate bread sliced on a cutting board

My mom says, “This is the best bread I have ever had.” And my mom has had a lot of good bread, much of it made by her, so I consider that the strongest endorsement for this delicious chocolate sour cherry bread.

This isn’t a sweet bread, just a loaf of my usual no-knead (Jim Lahey recipe) bread, with the addition of sour cherries I picked in summer and froze, and some good quality dark chocolate. If you’re unfamiliar with no-knead bread, it’s a bread that is left to rise overnight. It is baked in a dutch oven, which helps to create a crunchy crust. So delicious! Just takes a bit of planning ahead – there’s very little hands-on time, but you need to move the dough a few hours before baking.

It was the most delicious the day it was baked, and while still a little warm. But it was also very nice the next day, toasted, with a little butter.

Feel free to add a bit more chocolate or cherries if you want!

What you need:

  • 2 & 1/4 cups all-purpose flour
  • 3/4 cup rye flour (or use all ap flour)
  • 1/4 teaspoon instant yeast
  • 1 & 1/4 teaspoons salt
  • 1 & 1/3 cups water, room temperature
  • 6 oz good quality dark chocolate, chopped (I used Ghirardelli 60%, Bittersweet)
  • 1 cup pitted sour cherries (if using frozen cherries, do not thaw before adding)

What you do:

  1. In a large bowl combine the flour, yeast and salt. Add the water and stir just until it comes together. It will look a bit shaggy, but it’s fine.
  2. Cover the bowl with a lid, plate or plastic wrap and leave to sit at room temperature for 12 to 18 hours. Eighteen-ish hours is preferable, especially if it’s a little cooler in your place. This time around I left mine even longer, and it was probably my best ever. After about 4 hours you can work in the chocolate and cherries. I experimented with adding then in the beginning, but somehow it doesn’t rise as well.
  3. About two hours before baking time, spread out a large piece of parchment paper and put a coating of olive oil over it. Use a spatula to coax the dough out of the bowl, and then use floured hands to gently form it into a loaf, and place it seam-side down onto the parchment paper. Invert the bowl over the dough and allow this to sit for about 2 hours.
  4. About 1/2 an hour before baking, turn the oven to 450°F/ 232°C. (If using a Romertopf/clay baker, make sure you have pre-soaked it, and then place it in the oven BEFORE turning the oven on.) If using a cast iron dutch oven, place it in the cold oven to heat along with the oven.
  5. When the oven is ready, gently place the dough, seam side down, into the lidded baker. This should be pretty easy to do, since you can just pick up the corners of the parchment paper and transfer the whole thing into the pot. If you want to, you can use a sharp knife to make a few slashes a few centimetres deep into the top of the bread.
  6. Place the lid on the baking dish and bake for 30 minutes. After that time, remove the lid and bake for 15-25 minutes. The crust should be dark, and the bread should sound hollow when you tap it.
  7. Allow the bread to cool on a wire rack for about an hour. When it is hot it will be too sticky inside to cut, but after an hour the bread will still be warm enough for the perfect tasting experience.
  8. Enjoy!

Burgoo’s Tasty Tomato Soup

Burgoo is a popular Vancouver restaurant that serves the best comfort food. I tend to order this tomato soup because there aren’t a lot of meals on their comfort food menu that a lactose-intolerant person can eat.

Not only is this soup lactose-free, but it is soooo delicious! Also, it’s quite easy to make – once you’ve chopped everything up you just simmer for an hour, purée, and you’re ready to go.

I made a few changes to the recipe: since I am making it in Winter, I didn’t have fresh tomatoes that I thought would enhance the flavour. The recipe called for some canned and some fresh, and I have used all canned tomatoes. I added a few carrots, and I made the recipe a little bit smaller so it would fit in my pot.

This soup is even better after reheating, and freezes really well. I love making a massive batch and freezing most so I can have a healthy soup anytime I need it.

Just a word about the wine: please use a wine you would actually want to drink. If you like a sweeter red wine (ick), then you should probably use less brown sugar. The alcohol burns off, so there is none left in the soup, should you be serving it to people who don’t drink alcohol.

This serves 6-8 people.

What you need:

  • 2 – 796 mL cans of whole or chopped tomatoes (San Marzano are the best!)
  • 3 cups water
  • 250-375 mL your favourite red wine
  • 1 very large sweet onion (or two small ones), chopped
  • 4 cloves garlic, chopped
  • 2 carrots, chopped
  • 1/4 cup tomato paste
  • 2 Tablespoons balsamic vinegar
  • 2 Tablespoons brown sugar
  • salt and pepper to taste
  • optional: olive oil for drizzling before serving

What you do:

  1. Put everything in a large pot.
  2. Gently bring it up to a simmer.
  3. Simmer for one hour with the lid off, stirring from time to time.
  4. Purée, and if you want a super smooth soup, run it through a sieve or food mill.
  5. Taste to see if you want to add more salt, pepper, or anything else.
  6. Serve drizzled with a little olive oil, or not.
  7. Enjoy!

Christmas Baking Highlights

This post is all about some of my favourite holiday baking treats over the 10+ years of TrustInKim, so bakers have it all in one place. There are more recipes to come this year too!

Gingerbread People with red candy hearts.

Rum Balls! Another of my mom’s amazing recipes.

My mom’s fudge recipe, super easy, loved by all.

Sour Cream Cutout Cookies, perfect for decorating.

Jam-filled Cookies, which we called “ammonia cookies.”

This Chocolate Rum cake is not for the faint of heart.

Stollen with brandy-soaked dried fruit, almonds and marzipan.

Coconut Mango Cookies

And a few Savouries:

Bubbat Mennonite raisin and Farmer Sausage bread